
Article
How to speed up your Shopify website

PUBLISHED:August 19, 2022
UPDATED:November 27, 2023
I recently worked with a client to help them restructure their Shopify store and fix some functionality issues. During this task, I thought I’d check the page-load speed using Google’s free tool and found the site to be really quite slow. Especially on mobile. So, as a part of my work, I took it upon myself to perform some image optimisation as a way to improve the score.
Shopify website optimisation
Working on the image optimisation for this client got me thinking in general about Shopify website optimisation. Other than reducing the file size of your images, what else can be done to optimise the speed of a Shopify website?
Well, unfortunately, it doesn’t look like there’s much you can do. In fact, we touched upon this subject some months back in our article ‘What are the differences between WordPress & Shopify eCommerce Websites?’
In simple terms, unless you have a Shopify theme custom-built for your brand, you’ll be a slave to using a pre-built theme on a platform that contains lots of unnecessary code. Some of which may be badly written.
But don’t just take our word for it. Let’s look at some stats.
Why is my Shopify store slow?
Below this text, you’ll see a screenshot showing real-world test results from Google’s PageSpeed Insights tool. The website in question was The Coffee Collaborative. Just look at all of the red and orange warnings!
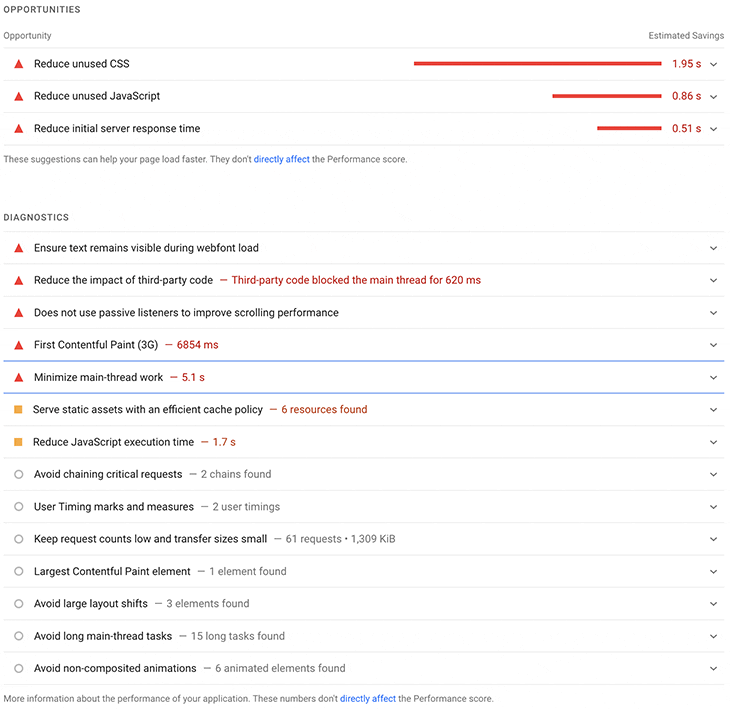
For those on mobile who’ll not be able to read the small text in the image, all of the warnings pertain to items that are largely out of control of the store owner, such as:
- Reducing unused CSS
- Reducing unused JavaScript
- Reducing initial server response time
- Ensuring that text remains visible during the loading of webfonts
- Reducing the impact of third-party code
- Reducing JavaScript execution time
Any items relating to code (CSS, Javascript, etc) are a result of Shopify itself or the template that has been chosen to create the front-end of the site.
Third-party code issues mainly relate to apps, which are Shopify’s equivalent to plug-ins. Each of which allows the store creator to add more functionality to their website, including fulfilment centres, payment gateways, and social feeds. Each app adds weight to your website, requiring time to load and execute the code needed to deliver the required functionality. This is also true for fonts.
How to make your Shopify website faster
So, if the majority of items reported by the likes of PageSpeed Insights can’t be improved by the store owner because they’re not a developer, how do you speed up your Shopify website?
You have a few options when it comes to improving the speed of your Shopify website. Here are our top five:
1 – Use an AMP app
Using an app to compensate for the lack of Mobile Accelerated Pages (AMP) will likely help boost your page speed on mobile devices.
AMP is an open standard framework designed to help deliver fast-loading web pages on mobile devices. And with more than 50% of shoppers regularly visiting sites using mobile devices, it’s important to make sure your website loads as quickly as possible.
2 – Use fewer apps
Yes, we know! We just told you to use an app to help boost the speed of your site, and now we’re telling you to use fewer apps. Welcome to the fun & games of running a Shopify store.
It’s all about weighing up the pros and cons. Will the impact of adding more apps be offset by the improvements that they are supposed to make? Only testing will lead to an answer.
3 – Reduce Content
We know it’s hard to resist adding all those wonderful marketing graphics to your website but please remember that every single little thing that you add to a web page will cause it to load just that little bit slower.
Try to be conservative with your content. Only include content that is of true value to your user and remove everything else.
Less content means less distraction for your user, enabling them to complete the tasks that you really want them to complete, such as making a purchase.
4 – Stop using carousels!
We regularly tell our clients that carousels are a bad choice for websites. They were all the rage 10-15 years ago, and yes, many site owners still want to use them, but there are very good reasons not to.
SEMrush has a good article which covers this in context with Shopify, but it’s good advice for all website owners in general.
For the purpose of our article, it’s simply an extension of point number 4 above. In that, carousels (aka sliders) contain a number of slides, each of which will likely include a title, support text, button and image. The more slides you use, the longer that device takes to load due to all of that extra content. Especially if the carousel is full-screen.
5 – Optimise your images
Thankfully, image optimisation is something that you are in full control of. Yes, there’s an app for that (are you getting deja-vu yet?), but there’s no need to use an app for Shopify image compression when a good image editor and online compression tool will do a better job.
Does Shopify automatically compress images?
Obviously, Shopify wants you to believe that they are doing their best to help your store load as quickly as possible, so if what they say is to be believed, then yes, they do automatically compress images. However, our tests show that there are improvements to be made above & beyond the standard Shopify image compression algorithm.
Here are a couple of screenshots from Google‘s PageSpeed Insights showing the speed score for The Coffee Collaborative website on desktop and mobile prior to image optimisation.
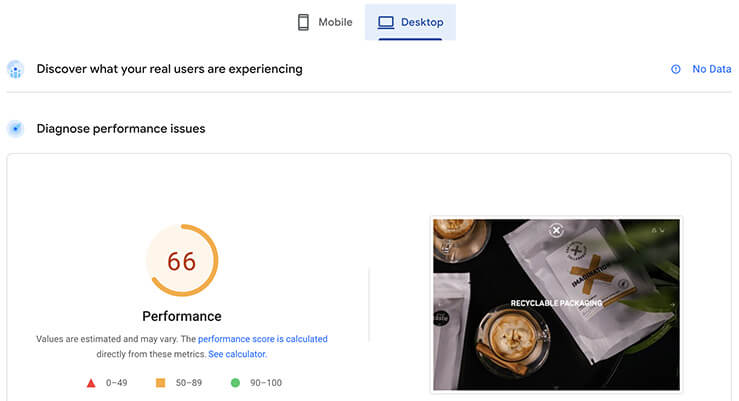
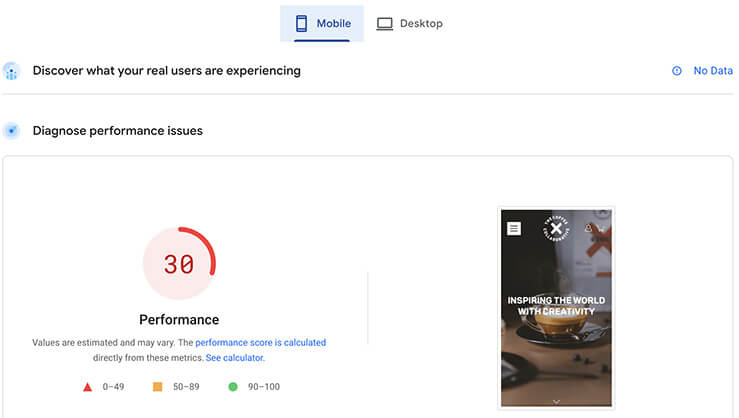
Desktop test results showed a below-average score of 66 whilst mobile shows a woeful score of 30. Pretty dire I’m sure you’d agree.
At LWDA we like to help our clients as much as possible, so I thought I’d try to make some improvements by optimising the images on the home page.
How to reduce image file size
Regardless of the platform, the approach to reducing image file size is the same. The aim is to compress the image enough to substantially reduce the file size whilst keeping image quality intact. We use two tools to achieve this aim:
- A great image editing application such as Adobe Photoshop
- An online image optimisation tool such as Tinyjpg.com
Adobe Photoshop is the industry standard tool for image manipulation and includes some powerful resizing and compression options. There are other tools available for both Mac and Windows, some are free and some are paid for.
We always find that once we export our images from Photoshop, we can get even better results by passing those images through Tinyjpg. So it’s definitely best to combine the two.
Shopify image size
The first step in tackling Shopify Image Optimisation is to decide on the physical size of the image that you need to upload to your site. Here we’re talking about the width, height and resolution of the image.
All too often we see clients uploading print-ready images to their websites and wonder why pages take so long to load. Print-ready images are usually hi-res (300dpi) and often quite large in terms of width & height. Too big for a website.
Although there is no specific size that can be attributed to all websites, there are ways to estimate the image dimensions that will best suit your needs.
Use Google Analytics to identify the users’ screen resolution
There’s no point in uploading images that would suit a high-resolution 27-inch monitor if most of your users are visiting on devices with smaller screens. And the way to find out this information is by using Google Analytics.
If you haven’t set up Google Analytics for your store, we suggest you do so right now. It’s a great way to understand how visitors use your site, which pages work and which don’t.
To find Screen Resolution data in the original version of Google Analytics (aka Universal Analytics or GA3), follow these instructions:
- Click on Audience in the sidebar
- Select Technology
- Under Technology, click Browser & OS
- Now click the small blue filter link that’s labelled Screen Resolution at the top of the results table
There is a built-in report for Screen Resolutions in the new version of Google Analytics (GA4). To access this report follow these instructions:
- Click on Reports
- In the Reports sidebar, expand Tech
- Under Tech, click on “Tech Overview”
- On the Tech Overview report, you will see a bar chart of users by screen resolution
From the overview report, you can click “View Screen Resolutions” to be taken to a detailed table. Similar to Universal Analytics, this table will show you total users, engagement, and if configured correctly conversions by screen resolution.
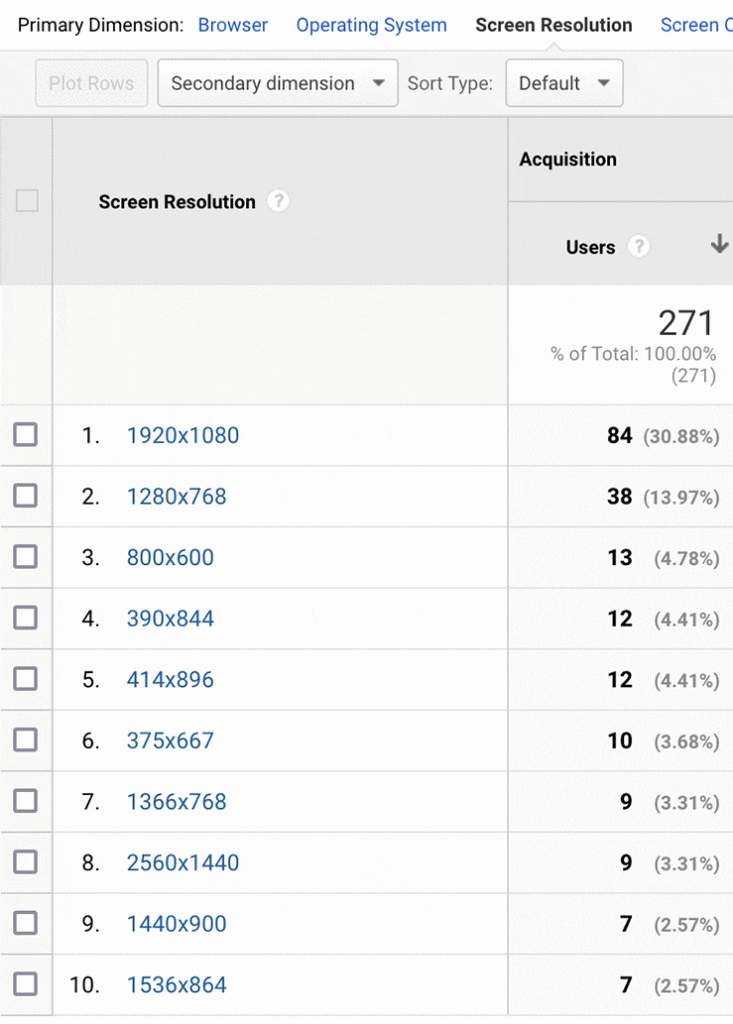
The screenshot above shows that most visitors to The Coffee Collaborative use a computer with a screen resolution of 1920×1080 pixels, with larger screens accounting for a little over 3% of users, so there’s no need to upload images larger than 1920×1080 pixels for the full-screen carousel at the top of the home page.
Image resolution is also important
Although many of us are now using hi-def screens with a resolution that is close to that of a printing press, this doesn’t mean that you should upload hi-res images to your website.
A full-screen image with a resolution of 300dpi can easily have a file size of 25MB uncompressed and several megabytes when compressed, which will put quite a strain on your website page-load times.
So, make sure that your images are 72dpi. DPI stands for Dots Per Inch, also referred to as PPI (Pixels Per Inch).
How to optimize images for web
Now that you’ve used your image editing program to correctly size your images, it’s time to optimise them.
The first step is to export your image in the required format and to use the image editor export tools to set a compression level.
We wrote an article on image file formats to help guide website owners here, but for the sake of this article, we’ll focus on JPEGs & PNGs.
JPEGS and PNGs are the formats most suitable for photographs, with PNGs allowing for a level of transparency within the file. So, for example, if you have a photograph of a person and you have cut them out of the background, you could use a PNG file to keep that background transparent when placing it on your web page.
JPEGs are the default for most web images that do not require any level of transparency.
When exporting your image, the trick is to not compress it so much that it starts to lose detail and look blurry or out of focus. Set the compression level you feel works best and save the file to your computer’s hard drive.
At this stage, you could upload the images as they are and your website would work quite well. But there are some excellent tools out there that can compress images even further without compromising quality.
Online image compression tools
There are a good handful of excellent free online image compression tools available. It’s best to try a few to see which one works well for you, but we have found that tinyjpg.com works great for both JPEG and PNG files.
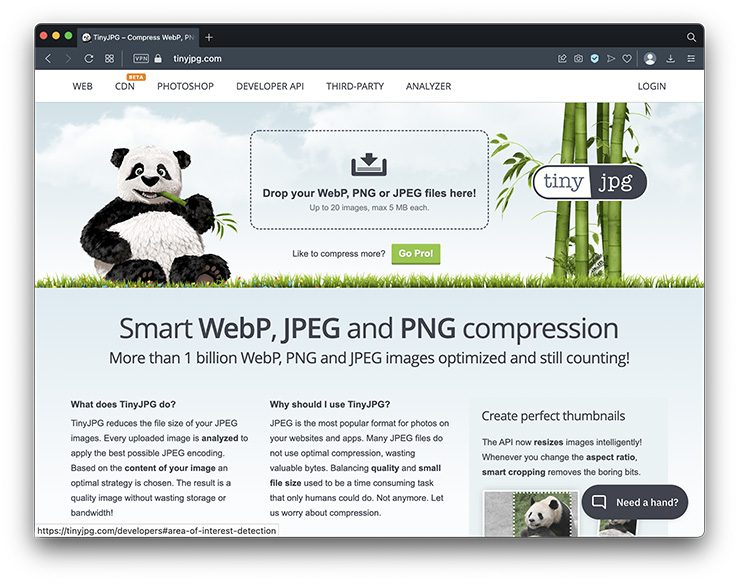
Simply drag & drop your files into the tool and watch the site shave off valuable kilobytes of file size that will help your web pages load faster.
Once the site has finished compressing your images, you can download them to your computer and then upload those new image files to your website.
Shopify website speed results
Remember the test I ran on The Coffee Collaborative website which gave a desktop speed of 66 and a mobile speed of 30 using Google’s PageSpeed Insight tool? We’ll after optimising the home page images and running the same tests, I got the following results:
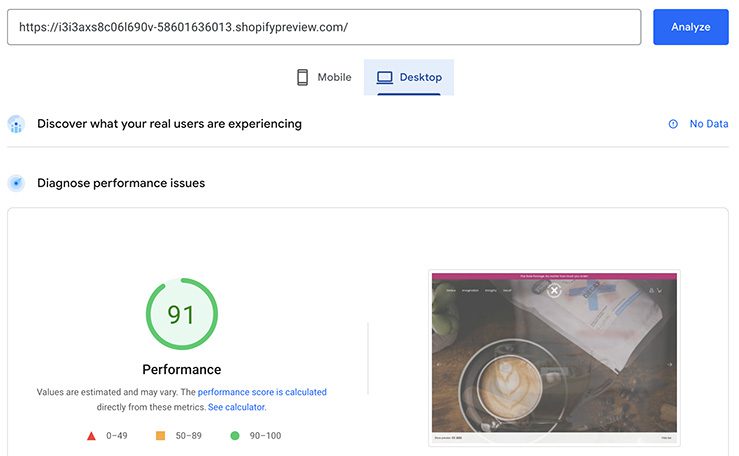
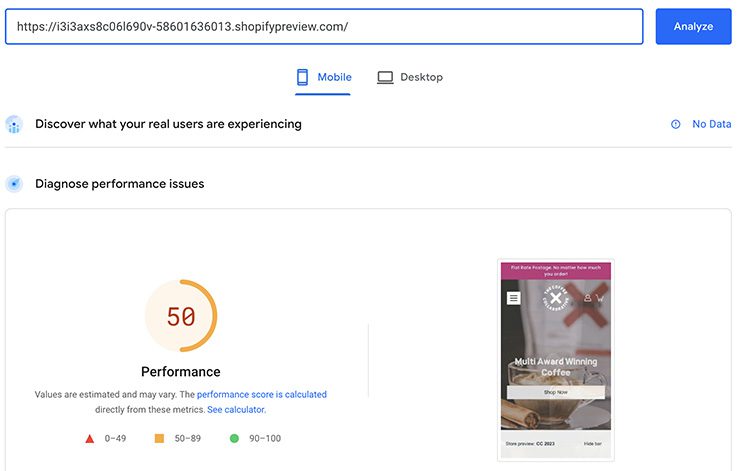
So that’s a desktop speed of 91 (a 25 point increase) and a mobile speed of 50 (a 20 point increase). Not bad for a quick review of just one page.
Now, I did also remove some content that I felt was over-complicating the experience, BUT imagine running this exercise across your entire site. What speed benefits do you think you could deploy for your users if you optimised your images? Not to mention the SEO benefits for your website!
Shopify website speed summary
There’s no doubt that Shopify is a great e-Commerce platform, especially for start-ups and smaller companies with smaller budgets. But convenience comes at a price, and that price is page speed.
It is possible to improve the page speed of your Shopify site, but doing so tends to involve altering the code (something that only a qualified developer should do) or installing apps, each of which comes with its own page-load handicap.
So, the key task for you to do if you want to improve the speed of your Shopify website is to optimise ALL of the images. From your logo through to product images and larger hero images, every single image should be sized and compressed properly in order to deliver the best page speed possible for your users.
Shopify website tips & tricks
We hope that you found this article on How to speed up your Shopify website useful. If you are struggling with your website and don’t have the resources to make changes yourself, drop us a line and we’ll discuss your needs.
If you liked this article you may also like the following:
- How much does e-Commerce website design & development cost
- Start Selling Online: Benefits of an eCommerce website
- How to migrate your website from Etsy to Shopify
We hope to see you again for more Shopify tips & tricks. Follow us on LinkedIn or Facebook to stay up-to-date.
Need a Shopify website for your brand?